
Nestled at the core of every household is the kitchen, a lively centre where gastronomic magic unfolds and kinfolk converge to exchange tales of their everyday lives. It’s an enclave filled with affection and memories, where each bubbling saucepan and crackling skillet weaves into the fabric of domestic existence. However, in these treasured interludes, it becomes all too common for countertops to amass clutter, for cooking areas to be stained with splatters of oil, and nooks to become havens for stray bits—beckoning pests like ants or rodents.
The pursuit of a pristine kitchen goes beyond simple visual appeal; it’s crucial for protecting your loved ones’ well-being. A hygienic place to prepare meals is essential in averting illnesses transmitted through food by pathogens such as Salmonella or E. coli that flourish on neglected surfaces. Reclaim your kitchen as a sanctuary free from filth instead of a landscape marred by dirt and disorder.
Step 1. Gather your cleaning supplies
As you prepare yourself mentally and physically (donning gloves isn’t overcautious!), remember this endeavour isn’t simply about removing visible filth—it’s about creating an environment conducive both to culinary creativity and familial harmony. With supplies at hand, roll up your sleeves—it’s time for battle!
- All-purpose cleaner;
- Disinfectant for killing germs;
- Sponges and microfiber cloths;
- Special cleaners for tough limescale or mould;
- Eco-friendly options for those conscious of their environmental impact.
Have these supplies at hand before you start. You might also want to add cleaning gloves and an apron.
Step 2. Declutter the kitchen and organise the cabinets
Decluttering first just makes sense. You might be surprised at how many expired products one has at the back of a cupboard. That task alone creates such a mess that you might wonder why you started in the first place. But anyhow, you won’t regret it once you’re done. You’ll also be happy you decluttered first, then cleaned.
Armed with a cloth and a sharp eye, search through the cabinets and pantry. This is the key to staying organised – having a tidy space that can handle the mess of daily life and helps in maintaining cleanliness in the long run.
- Remove any items from the countertops that don’t belong in the kitchen.
- Take everything out of the cupboards and pantry and wipe down the shelves.
- Check expiry dates and organise items as you put them back.
- Use airtight containers for open food items to prevent pests.
- Organise your utensils and gadgets, and ensure everything has a designated place.
- Consider placing moisture-absorbing products to combat mould in damp-prone areas, for example, underneath the sink.
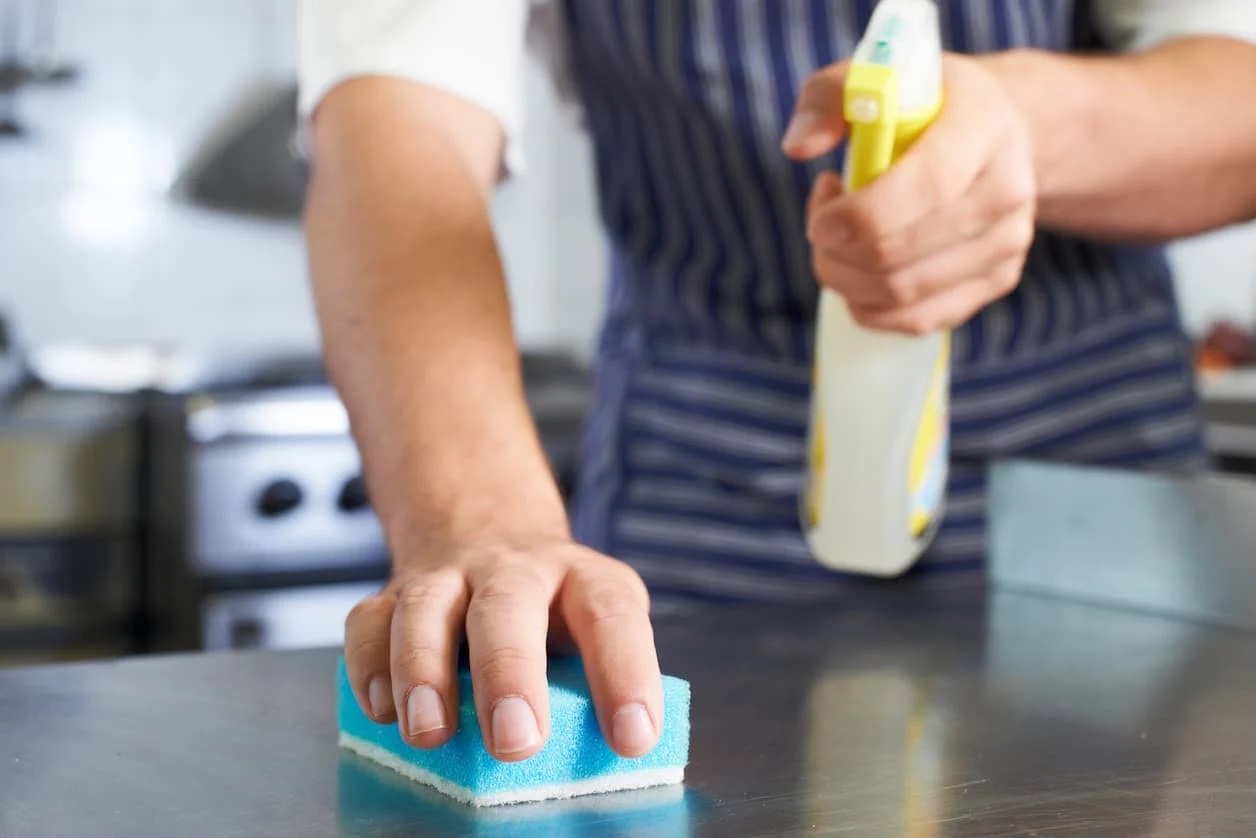
Step 3. Clean the countertops and surfaces
Kitchen countertops in your home often face the challenge of hard water stains and limescale. Now, to the heart of the matter. Countertops, the silent witnesses to your culinary adventures, require a careful, methodical approach. Whether battling the hard water stains that plague many homes or simply wiping away the day’s residue, your movements are precise, and your resolve unwavering.
- Begin with an all-purpose cleaner suitable for your countertop material—be it granite, laminate, quartz or otherwise—or opt for a vinegar solution if you prefer eco-friendly methods (one part white vinegar mixed with one part water). A spray bottle works wonders here; mist the surface generously before wiping down with a soft cloth or non-abrasive sponge in circular motions. This will handle most daily grime effectively without damaging sealants or finishes.
- Tackle tough stains by mixing baking soda with a small amount of water to create a paste. Apply this directly onto the stain. Allow it to sit for 5-10 minutes before scrubbing gently with a soft-bristled brush.
- For limescale specifically – Utilise specially formulated removers available on the market; products containing ingredients like citric acid work well. Follow instructions carefully; some might require dilution while others can be applied directly.
- Lastly, dry off each surface meticulously using either paper towels or better yet another dry microfiber towel which won’t leave lint behind—and voilà! Not only does drying prevent new mineral deposits from forming but also brings out that satisfying shine we associate with cleanliness.
Note: Remember to be gentle on sensitive materials like granite or wood. You can’t use just any type of cleaning products on them, so try to find the most suitable solution and test it on an inconspicuous area first.
Step 4. Shine the appliances
You can say that it depends on the cleanliness of the kitchen appliances to say you have a hygienic kitchen. If you can tell the story of each appliance, like the trail of crumbs, or where the splashes came from, it’s prime time to clean after your culinary quests. It’s showing respect to your kitchen realm.
- Refrigerator. Empty it, throw out expired items, and wipe down shelves with a mild detergent. Remember to clean the rubber seals and handle, which are often overlooked.
- Oven. An oven-specific cleaner is recommended for cleaning the inside of the oven. Alternatively, a mixture of baking soda and water can serve as a natural option. Remember to also clean the stovetop and knobs.
- Dishwasher. Regularly check and clean the filter. Run it empty with a dishwasher cleaner to keep it fresh and efficient.
- Small kitchen appliances. Begin by sanitising the surfaces of your smaller kitchen gadgets such as microwaves, toasters, and electric kettles. To freshen up your microwave, create a natural steam-cleaning solution with water and lemon juice in a bowl.
Step 5. Deep-clean the sink
Your kitchen sink often endures the most wear and can harbour harmful microbes if not properly maintained. This area requires diligent care to prevent it from becoming a haven for despair. Armed with a gentle sponge that won’t scratch surfaces and some vigorous scrubbing action, you’re on your way to restoring this vital part of your kitchen to its gleaming state.
- Start by removing any loose food particles and give the sink a rinse. This seemingly trivial step prevents clogs in your drain and ensures that you’re working on removing stains rather than pushing debris around.
- Next, apply a dedicated sink cleaner—be it homemade solutions like baking soda mixed with vinegar, or store-bought formulations designed specifically for kitchen sinks. These cleaners should effectively tackle grease and grime without damaging the surface of your sink, whether it’s stainless steel, porcelain, or any other material.
- Scrub with a non-abrasive sponge—chosen to prevent scratching delicate surfaces—it’s important to pay attention to areas around the drain and under the rim where gunk tends to accumulate unnoticed. For example, using an old toothbrush can help get into those hard-to-reach spots around fixtures and faucets where residues build up over time.
- Limescale presents another challenge—this chalky white buildup results from minerals present in hard water and typically manifests itself around drains or faucet bases. An effective limescale remover does wonders here, but ensure that it’s suitable for use on your particular type of sink so as not to damage it accidentally.
- Once you’ve thoroughly scrubbed every nook and cranny—and perhaps tackled persistent stains with targeted treatments—rinse away all traces of cleaning agents entirely. The leftover residue could potentially harm future dishes cleaned in the basin or even affect taste when filling pots for cooking.
Step 6. Clean the floors
The floors bear the silent testimony of your kitchen’s life. Turn up some music and sweep and mop with the grace of a seasoned dancer, you can restore them to their former glory, banishing crumbs and stains to the annals of history.
- Sweep or vacuum to remove crumbs and loose dirt.
- Mop the floor with a suitable cleaner for your floor type. For tiles, a mixture of warm water and vinegar can be effective.
- Tackle any stubborn stains with a brush or a targeted cleaner.
- Remember, regular cleaning can prevent sticky build-ups and make deep cleans easier.
Step 7. Finishing touches
In the aftermath of your great cleaning endeavour, you stand back and survey your work. The finishing touches – a polished fixture here, a replaced towel there – are the signatures of your victory over dirt and disorder.
Polish any stainless steel fixtures and replace dish towels regularly to avoid bacterial build-up. A fresh kitchen cloth can make a surprising difference to the overall feel of the kitchen.
Maintaining the cleanliness of your kitchen
Some days, the battle against time is as fierce as the battle against dirt. Speed cleaning becomes your strategy, a whirlwind of efficiency that leaves your kitchen sparkling against all odds.
Even when you don’t have a lot of time, there are still ways to keep the kitchen clean:
- Focus on high-traffic areas – countertops, stove, and sink.
- Use multi-surface wipes for a quick clean.
- Prioritise tasks – dishes in the dishwasher, quick wipe-downs, and straightening up can go a long way in making your kitchen look tidy.
The key to maintaining your newly reclaimed territory lies in routine. Daily, weekly, monthly, and quarterly tasks form the rhythm of your cleaning life, a steady drumbeat that keeps disorder at bay.
To keep your kitchen in top condition, break down tasks by frequency:
- Daily – Wipe down surfaces, sweep floors, and deal with dishes.
- Weekly – Mop floors, clean major appliances, and wipe down the insides of microwaves.
- Monthly – Deep clean the refrigerator and organise the pantry.
- Quarterly – Clean the oven thoroughly and declutter cabinets.
Conclusion
In the end, the clean kitchen is more than just a space – it’s a testament to your resolve, a symbol of order in the ever-turning world of a home. Keeping your kitchen clean is a vital part of home life, especially in places where dampness and small spaces can amplify cleaning challenges. Regular maintenance, combined with deep cleaning routines, can transform this task from a chore into a satisfying aspect of home care. Embrace these steps, and enjoy the benefits of a clean, hygienic, and welcoming kitchen space. Let your kitchen be a beacon of cleanliness and order in your life.


Comments